Bargello Pendant
A Beadwrangler Workshop
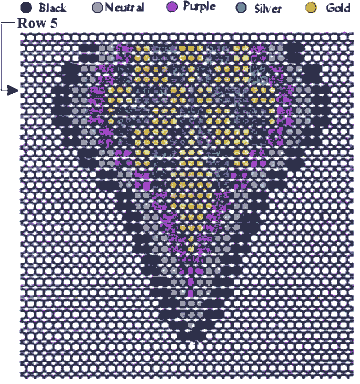
Color symbols: B=Black, N=Neutral,
P=Purple, G=Gold, S=Silver
All beads on the loom are size 8 seed beads.
Introduction My original pendant was made with size 8 seed beads and embellished with size 8 and 11 seed beads. The original colors for my pendant were Color B (Matte Black), Color N (Transparent Rainbow Gray) , Color P (Amethyst Silver Lined), Color G (Gold Silver Lined) and Color S (Crystal Silver Lined). These are very popular colors available in most bead shops. If you would like a variation of these colors, try changing Color N to a light turquoise and Color P to a dark turquoise. You could also use two shades of blue, red or other favorite color. You could also keep all the colors the same and just change Color P to your favorite color. If you want to change the gold or silver it will drastically change the overall appearance of the whole pendant.
Note 1 for Beginners If you have never woven on a bead loom, use the basic directions that came with your bead loom; use the step-by-step directions in Bead & Button June 1994 issue starting on page 11; or get the book, Those Bad Bad Beads by Virginia L.Blakelock at your local bead store or mail $15 plus $2.00 postage to Virginia L. Blakelock, 16510 S.W. Edminston Rd, Wilsonville, OR, 98070, or call her at (503) 625-7168. I will soon offer a step-by-step pamphlet on basic bead and fiber weaving on a loom plus other techniques. Watch for more information here at Beadwrangler’s Bead and Fiber Junction.
Note 2 for Beginners Once you have put all your warp threads on your loom you will put beads onto your weft thread and go left to right if you are right-handed; or right to left if you are left-handed. Your weft threads are single threaded on your needle. Begin your first row of beading by tying your weft thread onto the last outside warp (selvage edge) thread to your left on your loom or your right if you are left-handed.
Note 3 for Beginners When you begin weaving, do not pull your weft threads super tight each time you have finished a row or you will have a buckling of beads when you take them off your loom. You need only make sure your weft thread has been pulled through straight and ready for the next row.
Advanced Weavers The following instructions start the weaving at the widest point in the woven pendant. I find this is the easiest way for beginner weavers to learn and complete the piece. I am sure you will use whatever techniques you regularly use. You can skip all the finishing techniques if you prefer and use the illustration that is at the end of my written instructions.
Weaving Instructions for the Pendant You will need to put 32 warp threads onto your loom before you start. I use Silamide Thread for all my warp and weft threads and prefer it to Nymo. Start your first row of beads on the widest portion of the chart, row 5, and then decrease upwards from rows 4 to 1. Then weave back through the bead rows and start back on row 6. Rows 5 through 8 are the same length (no decreasing). You will begin to decrease down beginning with row 9 and through 29. If you are low on thread before you get to row 6, then weave your thread down through at least two rows; one row in one direction and the opposite direction in the next row and then cut off your thread. Needless to say you do not want to end out with one inch of thread left on your needle and still need to weave your thread through two rows before cutting it. Then thread your needle again and tie your weft thread onto the “current” (selvage edge) warp thread. You can again begin to weave. If you are left-handed you will tie your thread onto the right side and proceed. All decreasing is by one or two beads on each side of each row. Note: A minus sign in parenthesis indicates decreasing and the number of beads to decrease from the row you just finished on each side of each row. The complete loom pattern is shown below.
Bargello Pendant Loom Pattern
Note: Row 5 is the first row you will begin weaving beads onto your loom. Then you will weave up to row 1. When finished, weave your thread back to row 6 and begin weaving beads onto your loom on row 6.
Rows 1&2: 2B,2N,2P,2G,3S,3G,3S,2G,2P,2N,2B (-2 both sides)
Rows 3&4: 2B,2N,2P,2S,4G,2S,1G,2S,4G,2S,2P,2N,2B (-1 both sides)
Rows 5&6: 2B,2N,2P,3G,4S,2G,1S,2G,4S,3G,2P,2N,2B. (no decrease)
Rows 7&8: 2B,2N,2P,1G,4S,3G,3S,3G,4S,1G,2P,2N,2B. (no decrease)
Rows 9&10: 2B,2N,2P,2S,4G,2S,1G,2S,4G,2S,2P,2N,2B. (-1 both sides)
Rows 11&12: 2B,2N,2P,2G,3S,3G,3S,2G,2P,2N,2B;. (-2 both sides)
Rows 13&14: 2B,2N,2P,2S,5G,2S,2P,2N,2B.(-2 both sides)
Rows 15&16: 2B,2N,2P,5G,2P,2N,2B.(-2 both sides)
Rows 17&18: 2B,2N,2P,3G,2P,2N,2B.(-1 both sides)
Rows 19&20: 2B,2N,2P,1G,2P,2N,2B.(-1 both sides)
Rows 21&22: 2B,2N,3P,2N,2B.(-1 both sides)
Rows 23&24: 2B,2N,1P,2N,2B.(-1 both sides)
Rows 25&26: 2B,3N,2B.(-1 both sides)
Rows 27&28: 2B,1N,2B.(-1 both sides)
Row 29: 3B. (-1 both sides)
Finishing off the woven pendant After the tapestry has been completely woven, you will need to weave the warp threads back into the loomed piece one at a time. Take each warp thread on your needle and go down the nearest row of loomed beads about halfway and then turn into the row above or below and weave your warp thread in the opposite direction to the end of that row of loomed beads and cut off the warp thread. If your warp thread is real short go through about five beads in the nearest row and then turn into the next row and go as far in the opposite direction as your thread will go before cutting of the end. You can keep the tapestry on the loom while you remove the warp threads from the loom one at a time and weave the warp threads back into the tapestry. Weave a few warp threads back into the piece on one side of the tapestry and then go to the other side and weave a few in so you will slowly meet at the middle. This keeps your warp threads taut until you weave them into your piece.
Make Picos Next make picos around your tapestry piece by putting one bead between each row of loomed beads on the edge. Picos can also be put on during the weaving process.
Embellishing with beads on the bottom of the
pendant After the picos are finished, go to the bottom of your tapestry to the last
row with only three loomed black beads and bring your thread down between the first and
second black bead; put 3 size 11 black seed beads on your thread, then go through a size
8mm black bead and put on another size 11 black seed bead. Take your needle and go back
into the size 8mm black bead leaving the one size 11 black seed bead you put on last to be
your stopper bead and hold the 8mm bead on. Go back up through the 3 size 11 black seed
beads and back into you row of 3 loomed beads. Now take your thread through the loomed
beads to the space between the second and third black loomed beads and go down again with
another three black size 11 seed beads and through the 8mm bead, through the stopper bead
and back up through the 8mm bead and the three size 11 seed beads. Then weave back into
your tapestry and cut your weft thread. These instructions are illustrated on the bottom
of the Necklace & Finishing Detail illustration.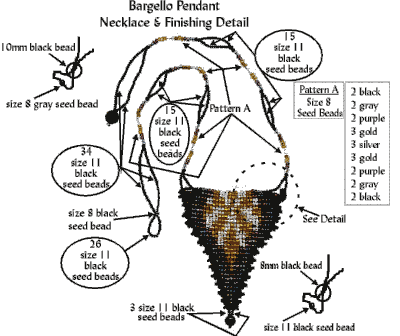
Necklace Strand Instructions Connecting the necklace strands to the loomed piece is shown in the Loom to Necklace Strands Detail illustration below. One side will have a larger bead (the catch) and the other side will have a loop of beads for the larger bead to go through. My book, Medicine Pouch Jewelry, has step-by-step directions for making more varieties of necklace strands and dangles as well as basic embellishment. We will start with the necklace strand that has the large bead at the end.
Necklace strand with bead catch Start with a new doubled thread woven into your tapestry and begin to string beads at row #5. String beads as follows:
15 size 11 black seed beads,
size 8 seed beads as follows: 2 black, 2 neutral, 2 purple, 3 gold, 3 silver, 3 gold, 2 purple, 2 neutral, 2 black,
15 size 11 black seed beads,
repeat size 8 seed bead pattern above (2 black, 2 neutral…),
15 size 11 black seed beads,
repeat size 8 seed pattern above,
34 size 11 black seed beads.
Then put one size 10mm black bead on and one neutral gray size 8 seed bead. Leave the neutral gray bead as the stopper bead and take the needle back through the 10mm black bead.
Next add 34 size 11 black seed beads going back down towards your tapestry.
After the 34 beads are strung go back through all the size 8 seed beads until you are at the next group of size 11 black seed beads.
You will again put on 15 size 11 seed beads and then again go through all the size 8 seed beads until you are at the next group of size 11 black seed beads.
Again, add 15 size 11 black seed beads and go through all of the size 8 seed beads.
Put 10 more size 11 seed beads on your thread and go into row #1 of your
tapestry, weave into the piece, and cut your thread.
Necklace strand with loop Now you are ready to make your necklace strand for the opposite side of your tapestry and make a loop at the end for the bead catch to go through. Follow the same directions as before, however, after you put on your 34th seed bead, add a black size 8 seed bead and then add 26 size 11 black seed beads. Next, go back into the same black size 8 seed bead, then come out and add another 34 beads going back down and repeat the rest of the pattern as you did on the other necklace strand with the catch. Weave into the tapestry piece and tie off.
With new doubled thread go back through both necklace strands a second time and then weave back into the piece and tie off. This is to give the necklace strands strength. You can also add a loop of size 11 black seed beads and wrap around each side of the necklace strands near the tapestry edge for additional strength. See the Loom to Necklace Strands Detail illustration. Your Bargello Tapestry Necklace should now be ready to wear!
| When you make copies of these instructions to share with your friends, please tell them you got them at Beadwrangler's. |