Beadwrangler Workshop

Circular Loop Technique

Workshop Index

The Junction


Circular loops of beads are great to make three dimensional forms and for embellishment, especially when several are grouped together. You will need Silamide, Nymo or other nylon beading thread in Size A for size 6, 8 and 11 seed beads and Delicas. You will need 00 nylon beading thread for smaller size beads. Use sharps or beading needles size 11 or 12 for the 6, 8 and 11 seed beads and Delicas. Use beading needles size 13 to 16 for smaller beads. Cut off 54" of beading thread. Beadwrangler measuring technique: Put your beading thread in one hand and hold it while using the other hand to pull the beading thread all the way to the opposite side of your body and stretch out. That is about 54 inches. Thread your needle. Do not double your thread or knot. This technique works best with size 6 to 11 seed beads and smaller seed beads can be used for embellishment to the finished loops and baskets.


Circle #1 
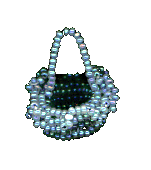
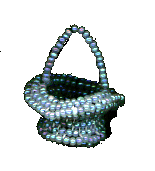
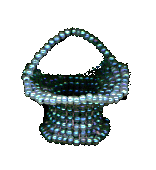
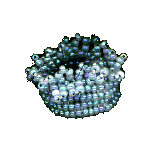
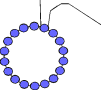
18 is the magic number for many formulas. Put 18 seed beads on your beading thread. Then make a circle by taking your needle through the first bead you strung on the beading thread and pull taut. You will have one long end of the thread hanging from the original 18 beads and a short end of thread. Make sure you have about 4" of thread on the short end so you can weave it back into the basket when you are ready to close the bottom. These 18 beads in a circle is the first row.
Circle #2 
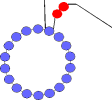
String on 2 more beads.
Circle #3 Make a circle around the nearest original bead in the group of 18.
Circle #4 
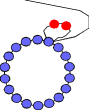
Pull the beading thread taut. Take your needle through the next bead of the original 18 and come back out.
Circle #5 String one bead on and loop around the bead you just came through and out the next bead of the original 18.
Circle #6 
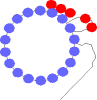
String two beads on and loop around the bead you just came through and out the next bead of the original 18.
Circle #7 Continue circling each of the 18 original beads; alternating 2 beads on one bead and 1 bead on one bead. The beads should all stick out around the original 18 beads. You will have to hold the short end of thread taut as you work or the beads will get loose. You can use a hemostat or other grasping tool to hold the short end until your are ready to weave it back in. If the loose thread really drives you crazy, weave the thread in after you have 3 rows completed. You will have to add new thread when you are ready to close the basket bottom.
When all 18 have beads have beads looped onto them, take your beading thread and needle through the beads you just put on top of the original 18 and pull taut. This is the second row of the basket. All row counting begins with the original 18 beads or number in which you begin your circle.

Each time you put on another new row of beads from the formulas provided, you will go back through them with the thread and pull taut before starting the next row. Each row will have alternate bead groups. Your whole basket will be made this way. Check the Closures and Embellishment Techniques to close the basket bottoms and for decorative embellishment. Any thread left loose on the basket will need to be woven through the beads in the basket. After you have made the whole basket, you will need to go back through the basket with additional thread to strengthen the basket shape. You will find that the thread bulks up through the beads as you work, so you do not want to add thread for strength until you are finished adding the handle and all embellishments.

Return to Your Basket Project
(click on basket)

Ruffle Basket Collar Basket Wide Brim Basket Looped Edge Basket


Closure and Embellishment Techniques

Take the thread still hanging from the 18 beads and put your needle through it. You will add 1 bead and loop it around every other bead of the 18. That will give you 9 beads sticking out from the 18. Take the needle and go through the 9 and pull taut. Next add 1 bead on every third bead of the 9. That will give you 3 beads. Go through the three beads and pull your thread taut. Then weave your thread back and forth through the bottom of the basket for strength. Cut off excess thread. If your thread is not long enough to complete this formula, weave it through the basket and put new thread on to finish closing the basket. For embellishment around the rim of the basket and handle, loop 1 to 5 beads around a bead on the basket rim or handle and continue in each bead that you want to embellish. When finished, go through each bead and the loop around it a second time, but do not sew through all the beads and pull them together. Let each bead loop stick out separately.

Return to Your Basket Project
(click on basket)

Ruffle Basket Collar Basket Wide Brim Basket Looped Edge Basket

Basket Handle Technique

To make simple handles, start by doubling thread on the needle and sewing into one side of the basket until the thread is taut. Weave the thread up to one side of the basket, near the opening and put 20 to 24 beads on the thread. Then go across to the opposite side of the basket and sew into the beads and pull the thread taut. Go through the bead strand as many times as the thread will pass through the beads for strength. Then sew back into the middle of the basket to make sure the thread will not come out and cut off the excess thread. Handles can be embellished, made in different techniques and thickened by adding more beads.

Return to Your Basket Project
(click on basket)

Ruffle Basket Collar Basket Wide Brim Basket Looped Edge Basket