Supplies
|
Seed
Beads |
size 11, 4
colors
Colors 2 and 3: about 3 strands;
Colors 1 and 4: about 6 strands.
Strap for Purse B: about 3 strands. |
|
Seed Beads |
size 8, 1
color. These beads are separators between strands; 1 strand will probably do. |
|
Seed Beads |
size 14 or 16,
1 color. They go before and after the size 8s and 2 strands should do. |
|
Thread |
beading
thread; I use Silamide Size A. Use a color that matches the ribbon fabric edge. |
|
Needles |
sharps size 11
or 12 and/or beading needles size 12. I use sharps for stitching the ribbon together and
the small loops on the purse and beading needles for the longer bead loop fringe. |
|
Pin back |
small 1"
for purse A. |
|
Flat |
1 each for
Purse A; this is a bead that is domed on top and flat on the bottom and the hole goes
sideways; you could also use a small button or 6mm bead. |
|
Thin cord |
about 5"
for flat or button closure for purse A. |
|
Optional |
small snap for
closure on either purse. A snap would take the place of the cord on Purse A and fit behind
the flat on the purse inside. A snap would be inside Purse B at the very top. |
|
Ribbon |
thin fancy
ribbon - 1Ľ" to 1 ˝" in width, 10" in length. You can usually buy ribbon
by the foot (12"). Purse B has a strap and requires 2 size 8 to 10mm beads. You will
need about 3 strands of seed beads for stringing the strap. |
|
Optional |
table light
with extension cord and magnifier if you need them for working with small beads. |
Terms
|
sb |
seed beads.
All size 11s will be listed with sb and a number to indicate how many, example 3sb
is 3 seed beads. Size 8 and 14 seed beads will be listed as size 8 and size 14 without the
words seed beads added. |
|
tie
off |
Use a needle
to sew in loose threads and cut off the excess thread. |
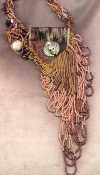
| Take 10"
of ribbon and fold it in half with the right sides on the outside, (See Fig. 1). Take the
open fancy ends and fold each end Ľ" towards the inside. Use a straight pin to hold
the ends together if necessary while stitching the edges together, (See Fig. 2). Now fold
each edge of that end again to form an inverted "V" or envelope shape. Both
edges should come together. Stitch these two edges down with beading thread., (See Fig.
3). Now take the opposite end from the envelope end, bring it forward towards the envelope
end, about halfway. Use straight pins if needed to hold the ribbon until it is stitched
down. Stitch along one side from the envelope edge to the other end, you will be stitching
4 thickness when you get to the halfway point where the ribbon is folded and tie off the
thread at the end. Do the same on the other side. Leave the middle folded area open, (See
Fig. 4). Fold the envelope end down towards the other end; the fold should be right where
the purse opening starts. The envelope end should reach almost to the bottom of the folded
end, (See Fig. 5). The purse overlapped should measure about 1Ľ" in length. Now you
are ready to add the flat. Stitch it to the very edge of the envelope bottom in the
middle. Next take the cord, measure enough cord to go around the flat and make a knot
below that. Stitch the knotted cord end to the bottom of the folded purse edge. Now you
should be able to put the cord around the flat and close the purse. The following
instructions are for bead embellishment to the purse flap and around the purse edges. When
you finish the purse flap and bead fringe, us e a needle and thread to sew on a small
pinback onto the back of the purse and tie off.. Then you will have finished your Jasmina
Ribbon Broach. |
Flap for Purse A
Use 4 different color sb. Start at one side of the
purse flap, from the underside of the purse to the front. Thread the needle and knot the
thread end. Take the needle through one purse flap edge and make sure the thread is taut.
String on 1sb of Color 1, 1sb of Color 2, 1sb of Color 3 and 1sb of Color 4 and take the
needle through the front of the purse flap edge and back out. (See Fig 6). Now you are
ready to make the next stitch. You are making bead loops around the purse flap. Continue
around the edge until you get to the middle where the flat is. Stitch underneath the flat
and then continue the bead pattern on the other side. When you get to the end of the flap
on the other side, tie off.
| Take
10" of ribbon and fold it in half (See Fig. 1). Take both ribbon edges and fold them
under, Ľ" of the fancy side folded towards the inside and sew across, stitching them
together (See Fig. 2). Now move that folded side to the middle of the ribbon on one side.
Fold the ribbon again with that folded portion to the inside right in the middle, (See
Fig. 3). Stitch the length of both sides of the ribbon together leaving an opening at the
top, (See Fig. 4). The ribbon folded should be about 2" in length. Now the purse is
ready for embellishment and the strap. See Purse Fringe for A&B for embellishment
around the purse edge. |
|
Making Purse Fringe for Purse A & B
From the front to back, start with
Color 1, then Color 2, then 1 size 8, then Color 3 and finally Color 4, then stitch into
the back of the purse, go through the ribbon to the front side and begin the next strand,
(See Fig. 7). You will continue around from one side to the other and continue until you
are getting low on thread. Tie off , add more thread and continue. The strands will begin
as small loops, become longest at the middle of the purse and then become small again on
the other side. Refer back to Fig 6 to see several loops lining up along the purse. Loops
will be much closer together than shown in the illustration.
Side Fringe for Purses A&B Note: The size 8 seed bead will always be in the middle between
colors 2 and 3. Note: The size 8 seed bead will always be in the middle between
colors 2 and 3.
First strand 2sb of color 1, 3sb of color 2, 1
size 8, 3sb of colors 3&4.
Next 3 strands 3sb color 1, 3sb of color 2, 1 size
8, 3sb of colors 3&4
Next 3 strands 4sb of color 1, 3sb of color 2, 1
size 8, 4sb of colors 3&4
Next 3 strands 5sb of color 1, 3sb of color 2, 1
size 8, 5sb of colors 3&4
Next 3 strands 6sb of color 1, 3sb of color 2, 1
size 8, 6sb of colors 3&4
Continue adding 1 more sb of each color in size 11
for each 3 strand group of sb; always 3sb for color 2.
You will continue adding a sb as you do the next 3
strands. When you get to one end of the purse edge you should have about 12sb of each
color in the strand. The number of strands per side will depend on the length of the
ribbon purse folded and how close you set your bead strands. |
| Bottom Fringe for Purses A&BFrom the bottom across, add 1sb to color 1, 3 &4, continue 3sb
to color 2; increase in each strand across. For longer strands, add 3sb to colors 1, 2,
3&4 in each strand. When you get to the middle, make the middle strand 3sb longer per
color than the last strand, then start back with the same combinations you previously
used. When you start back up the other side, use the same number of sb you did to go down
the first side. You can also start thread and needle on each purse side and put equal
strands on each side as you work towards the bottom to make sure they are even. |
You can stop now and your
purses will have loops of beads hanging around the purse that swing and sway with your
every move. You can also add the fancy finishing which pulls in the beads more and they do
not swing and sway as much. Make some purses with fancy finishes and leave it off others. |
Fancy
Finishing for Purses A&B String on
new beading thread and take the needle into one side of the purse near the fringe. Take
the needle through the first strand of beads and bring the needle out next to the size 8,
string on 3 size 14s or smaller, and take the needle through the size 8 of fringe and tie
off. (See Fig. 8) Your Jasmina Ribbon Purse fringes are complete. |
|
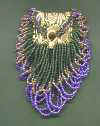
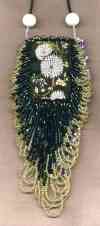
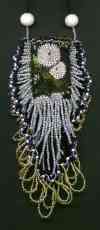
Necklace
Strap for Purse B String new thread, doubled, long
enough to go from one side of the purse, around your neck and back to the purse and still
be able to get the strap over your head, add 6 more inches on each side for stitching into
the purse. Knot one end of the thread and stitch into the purse through the first loops of
one side of the purse so the thread does not show. Stitch back and forth a few times to be
sure the thread is taut, then begin stringing. String 10 seed beads, then one of the large
beads, then continue with seed beads until you are near the end, add another large bead
and 10 seed beads and stitch into the other side of the purse. Stitch back and forth until
you are sure the purse is taut and tie off, (See Fig 9). Add another strand of thread
around and through the strap for strength and tie off. You can string the strap in groups
of the same colors as the fringe and put a size 8 bead between each group. You can add
beads around the edge of the purse opening using the color combination used in Purse A and
tie off. Your Jasmina Ribbon Purse Necklace is finished. |
| Adding
Earrings You can use
smaller ribbon to make miniature earrings like the envelope shape of Purse A and stitch
the front closed rather than having openings. Glue on earring studs or sew a beaded loop
to the top of each and put on earring findings. Have fun! Make up your own creations. Read
the Jasmina Ribbon Purse story that goes with the purses. |
Copyright© 1998 Lyden Enterprises
All rights reserved. No part of these instructions may be transmitted in any form or by
any means, electronic or mechanical, including but not restricted to, recording or by any
information storage and/or retrieval system without prior permission in writing from the
author.
Designs shown in these instructions are intended for personal use only. Mass marketing of
the designs as finished work or as kits is prohibited without permission in writing from
the author.
Instructions and designs have been tested and are presented in good faith, but no warranty
is given, nor results guaranteed. |
| When you make copies of these
instructions to share with your friends, please tell them you got them at Beadwrangler's. |
Return to top
|