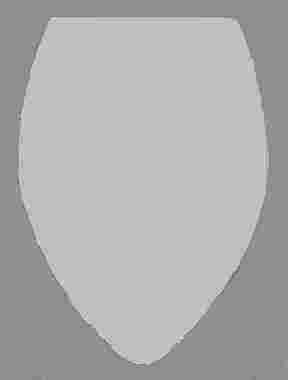
| Bead edge stitch each piece together and
make sure you have the right-sides all facing one side. Leave off beads 1/2" to
1/8" from the top edge of the purse opening. This is the area where the purse opening
will be attached to the strip. When you have all the pieces edged stitched with beads,
your purse should be sewn together in a circle at the top and the bottom of the purse. The
bottom of the purse should have all the bead edges meeting in a point. Stitch through
these beads another time to make sure the bottom is secure and tie off. Tying off is also
included in my book. 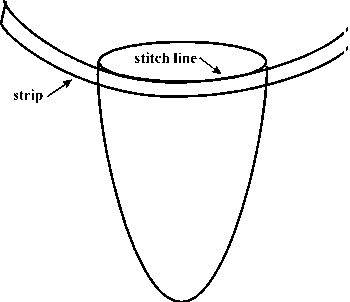 Now take
the 2" wide strip and line it up with the top of the purse opening, right sides
together. The strip is longer than the circumference of the purse opening. The place where
the strip comes together is where the opening will be for the cord. Leave an equal amount
of the strip on each end past the purse portion. Turn the strip down so you are looking at
the wrong side of the strip and the right side of the strip is facing the right side of
the purse, put the very edge of the strip next to the purse edge. Use pins to hold down
the piece while you sew. Leave an equal amount of leftover strip on each end. You will be
stitching where the bead bead edging ends and there is only stitched thread at the top of
the purse. See the illustration. Silk pins are less harsh than straight pins on soft
leather. Silk pins are also good on ultrasuede. You can also just hold the piece as you
sew, as long as you do not pull in the extra portion of the strip on the ends. Do not pull
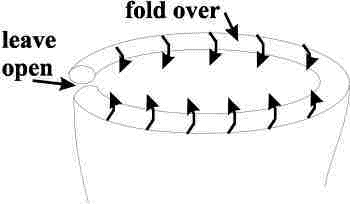
the leather so it hard that it stretches. Now take
the 2" wide strip and line it up with the top of the purse opening, right sides
together. The strip is longer than the circumference of the purse opening. The place where
the strip comes together is where the opening will be for the cord. Leave an equal amount
of the strip on each end past the purse portion. Turn the strip down so you are looking at
the wrong side of the strip and the right side of the strip is facing the right side of
the purse, put the very edge of the strip next to the purse edge. Use pins to hold down
the piece while you sew. Leave an equal amount of leftover strip on each end. You will be
stitching where the bead bead edging ends and there is only stitched thread at the top of
the purse. See the illustration. Silk pins are less harsh than straight pins on soft
leather. Silk pins are also good on ultrasuede. You can also just hold the piece as you
sew, as long as you do not pull in the extra portion of the strip on the ends. Do not pull
the leather so it hard that it stretches.
Take your needle and thread and begin at
one end whip stitching or making tiny quilting type stitches until you are at the end and
have joined the two pieces from the inside and tie off. Add new thread and turn the strip
over and fit the outside edge next to where you just sewed the pieces together. Now stitch
this side down. You do not have to turn the leather/ultrasuede under or overlap it. Just
stitch it right down. You can sew the piece together on a sewing machine, I happen to like
the fact that my purse is all handmade even if it does take longer.
At each end where the strip meets, do
tuck under the leather around the edges and then stitch down at the bottom where the purse
and strip edge come together. Do not sew these two ends together; this is where the cord
will go through. Finish and tie off. See the illustration.
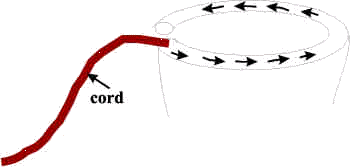 Now take a cord and attach a safety pin to
it. Push it through the opening of the strip on the purse to the other end and back out.
Now pull the cord together so the purse closes. Take your hand through the cord opening
and see how much space you need for it plus about 4" for the bead closure. When I
close my purse tight, there is approximately 4" of cord before the bead closure,
however, I have a skinny wrist, the only thing skinny on me I fiberjest you not! Now take a cord and attach a safety pin to
it. Push it through the opening of the strip on the purse to the other end and back out.
Now pull the cord together so the purse closes. Take your hand through the cord opening
and see how much space you need for it plus about 4" for the bead closure. When I
close my purse tight, there is approximately 4" of cord before the bead closure,
however, I have a skinny wrist, the only thing skinny on me I fiberjest you not!
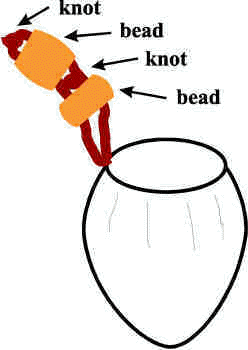
Purse closure: String on one large 12 or
14mm bead through both cords. Then make a knot at the top of the big bead. Make sure you
have measured the length you need for your wrist before doing this. Then string on the
second large 12 or 14mm bead and make another knot. Now take Silamide thread and stitch
the top knot closed. You can also embellish the knot with beads or stitchery. Now pull the
bead below the knot next to the purse opening to close it and pull it back up next to the
knot to open it. See the illustration. Nifty eh? this is an idea I found from the 1880s
through the 1940s while cataloging purses.
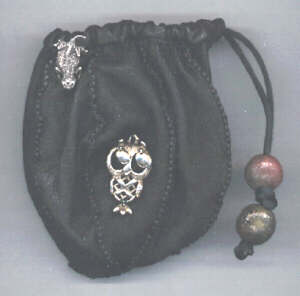
Now you can embellish the outside with
beads and charms. Remember, part of the beauty of the purse is the fiber, don't bugger
it up so much with embellishment that you no longer recognize the purse you created. I put
my Native American form beads on one of the quadrants, skipped some quadrants and then put
on my owl and finally stuck my horny toad tie tack at the top near the opening.
You now have a Mighty Pumpkin Purse!
Enjoy! I would love to see photo images of your creations. We will put them up on our
website and share with viewers. This is a project you can do with your children. Get the
boys to make a pouch to keep arrowheads and marbles. They can use a leather strip for the
strap if they find the cord too feminine. You could make this purse with more sections and
lengthen the 2" strip; experiment and come up with new ideas. You could also put on a
longer cord and wear the purse on on your shoulder. It is a little too large to wear as
purse necklace.
I have carried this purse around in my
larger purses for over a year, it has gotten lots of wear, and yet none of the stitches
have come out. I used Silamide size A thread and can always depend on its strength.
What's next for the Stitchery Circle? How
about a doll shape, an 1880s mini purse or shapes for embellishment to other items? Email
me and let me know what you find most exciting. |