 |
Victorian
Purse Project Needleweaving Technique A Beadwrangler Workshop |
|
Victorian
Purse Project Needleweaving Technique A Beadwrangler Workshop |
| The Junction |
Workshop Index |
BeadArt Workshops |
NeedleArt Workshops |
FiberArt Workshops |
BeadCrochet Workshops |
Purses, purses, purses! What is it about little containers that are so mesmerizing? I continue to create new designs for purses, baskets, jars and other containers. I want to share my designs with you. This is just a one of many to come. The instructions are for those who already know how to tapestry weave or needle/pin weave and have some basic experience in beading.
If you do not know how to needle weave you can teach yourself with the aid of Beads and Threads, a book authored by Diane Fitzgerald and Helen Banes, ISBN 0-9620543-5-6. This book is a melding of beads and fiber through tapestry weaving and has very good instructions. It includes incorporating beads directly onto the warp threads. Beads and Threads can be purchased at most of your local bead and book stores. Threads Magazine published an excellent article in their February/March 1990 issue titled Fiber Jewelry by Susan Pence Beaudry and Helen Banes. This article has step-by-step instructions and graphics to learn needleweaving. Handwoven published an article titled Tapestry Weaving on a Pin Board by Ronnie Bohannan in their March/April 1988 issue. This article gives instructions for making a tapestry belt and those techniques can be used for making purses. Handwoven's article, A Beaded Butterfly Necklace by Lois Fronk, can be found in their May/June 1995 issue. This is a how-to project for needleweaving a butterfly and incorporating beads. Threads Magazine published a how-to article on pin weaving, Making Custom Fabric by Diane Ericson, in their February/March 1994 issue. There are instructions for making a vest using pin weaving techniques and graphics are included. There is also a wonderful out-of-print book titled Shaped Weaving by Nik Krevitsky and Lois Erickson, ISBN 0-442-22321-8 (paperback) and -4 (hardback) that has a wealth of information on needle and finger weaving techniques if you can get your hands on a copy. Handwoven Magazine published two articles in their May/June 1995 issue by fiber artist David Johnson. The first is titled Small Looms to Make or Adapt For Tapestry which includes adapting an inkle loom for tapestry weaving. The second article, How to Weave a Tapestry Pendant, offers many tapestry techniques.
You can also learn these weaving techniques at local organizations such as weaver's guilds, embroider guilds, bead societies and bead stores. If they do not teach these techniques, they can probably offer a source.
I use Silamide thread for all bead embellishment. The Conso thread used for warp threads in your loom can also be used in the strap of the purses. I use fine quality Czechoslovakian and Japanese glass seed beads in my work. Size 11 seed beads were used for the Victorian Purse with the exception of a size 8 where noted. Size 6 and 8 seed beads, 8mm and 12mm beads were used in the strap. Fibers are noted in each purse description. I work with many fibers, some thick and others thin. Most of my pearl cotton is equivalent to DMC 3, 5 and 8. I often use found objects to incorporate into my pieces. I use all kinds of beads in larger sizes including unusual plastic beads and forms if the color is permanent. I use English sharps and beading needles for seed beads. Tapestry needles are used for weaving the fiber. Sewing needles can be used to sew finished woven purse parts together. I use my bead sharps needles size 11 or 12 or size 12 quilting between needles to sew the pieces together; whichever is nearest when I am ready to sew.
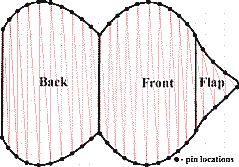
These patterns are basic outlines to use and design your own creations. They are set up for grids with 4 squares to the inch. You can use a grid with more squares per inch for a more intricate pattern, however, it will take longer to weave.
Victorian Purse
| flap | no flap |
 |
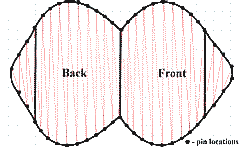 |
Needleweaving Pattern Setup
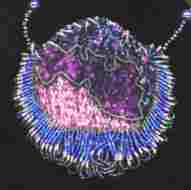
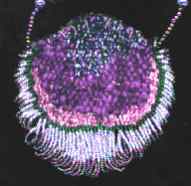
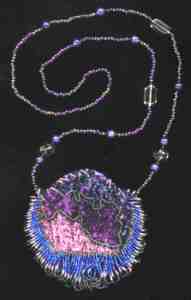
The Victorian Purse pattern is a more organic shape. I came up with this design after looking at several antique purses in books. Victorian Purse Pattern with flap is designed to be folded in three parts. The second pattern, Victorian Purse Pattern without flap, is rounded off in an oval shape at the openings and does not need a closure. Look at the image of the purse I made and you will see the rich combination of handspun silk, metallic and rayon yarns combined along with beads that just happily cling to the fiber. If you use the pattern with the flap, you would sew the two sides together after you have finished weaving and leave the flap open. Then you would make a closure just as noted for the Wallet Purse. If you use the pattern without the flap, you could put a snap inside if you wanted or even a zipper; I fiberjest you not. You could leave off the strap and use this little purse inside a larger purse. You would not want to have a lot of wavy bead fringe if you did this. They would catch on everything unless you have a special section for the purse. You could make an edging with the button hole stitch with one or two beads between and keep the thread snug or just leave the beads off and add metallic thread around the edge.
|
|
If you look at the two images (front and back) of the purse I made from the Victorian Purse Pattern without flap, you will see the bead fringe has different color combinations on each side. You could wear the purse with either side showing for a variation in colors. Here is an easy formula to follow:
Imagine you have six seed bead colors to use and we number them Color One through Color Six.
Start your fringe on one side of your purse near the top opening where you stitched the two sides together. Pull your needle (with doubled thread and knotted) through your fiber. Then make a small stitch into the fiber and back out to make sure your thread is set securely in the fiber.
Note: all beads are size 11 except the 1 bead of Color Four which is a size 8 seed bead.
Put on 3 beads of Color One,
2 beads of Color Two,
2 beads of Color Three,
1 bead of Color Four,
2 beads of Color Five,
2 beads of Color Six,
3 beads of Color Four.
Take your needle and go into the fiber on the opposite side of your purse, again near where the two sides are sewn together; make three rows. You are actually making the fringe wrap around the area where you sewed the two pieces of the purse together.
Next make five rows:
3 beads of Color One,
3 beads of Color Two,
3 beads of Color Three,
1 bead of Color Four,
3 beads of Color Five,
3 beads of Color Six,
3 beads of Color Four.
Next make five rows:
3 beads of Color One,
4 beads of Color Two,
4 beads of Color Three,
1 bead of Color Four,
4 beads of Color Five,
4 beads of Color Six,
3 beads of Color Four.
Then make five rows:
3 beads of Color One,
5 beads of Color Two,
5 beads of Color Three,
1 bead of Color Four,
5 beads of Color Five,
5 beads of Color Six,
3 beads of Color Four.
Make five rows:
3 beads of Color One,
6 beads of Color Two,
6 beads of Color Three,
1 bead of Color Four,
6 beads of Color Five,
6 beads of Color Six,
3 beads of Color Four.
Make five rows:
3 beads of Color One,
7 beads of Color Two,
7 beads of Color Three,
1 bead of Color Four,
7 beads of Color Five,
7 beads of Color Six,
3 beads of Color Four.
Make five rows:
3 beads of Color One,
9 beads of Color Two,
9 beads of Color Three,
1 bead of Color Four,
9 beads of Color Five,
9 beads of Color Six,
3 beads of Color Four.
Make three rows:
3 beads of Color One,
11 beads of Color Two,
11 beads of Color Three,
1 bead of Color Four,
11 beads of Color Five,
11 beads of Color Six,
* 3 beads of Color Four.
Make 16 rows
3 beads of Color One,
13 beads of Color Two,
13 beads of Color Three,
1 bead of Color Four,
13 beads of Color Five,
13 beads of Color Six,
3 beads of Color Four.
Now you are three fourths across the bottom of the purse.
Go back up to the asterisk(*) and follow the number of beads to repeat the pattern back up
the purse.
Your other choice is to put your fringe on both sides at the same time with two different
needles and thread. Work a few rows on one side, then go to the other side and do the same
number of rows.
I used fibers as follows: purple silk, lavender mix of rayon and metallics, and a lavender and green mix of rayon and metallics.
Glass bead colors were:
Color One - transparent gray,
Color Two - transparent rainbow sapphire,
Color Three - transparent matte lavender,
Color Four - transparent emerald (peacock) green
Color Five - transparent amethyst rainbow,
Color Six - crystal lined with purple.
Your fringe should be short at the beginning and slowly lengthen as you go towards the middle of the purse ( bottom edge) and then shorten as you go back up the other side. On one side of the purse I back stitched some lavender beads as an outline around the silk fiber to make one focus on the silk. I used a size 8 green seed bead for the middle bead of Color 4. It twinkles through all the rest of the size 11 seed beads in the purse. I also made loops of about 12 matte lavender beads at a time at the opening of the Victorian Purse by going from one side to the other with the groups of beads for accent.
Your will have to adjust your purse fringe depending on how close you space your stitches. You may need more or less rows of one sequence or another. Notice how each side begins and continues with three beads and the rest increase with the exception of Color Four in the middle. I have found this grouping of colors very attractive to the eye. Experiment with different variations in length of fringe and bead combinations.
Start on one side of the purse (where the two pieces are joined next to the opening) with double thread on your needle and string 12 size 6 seed beads, 1 size 8mm bead, 1 size 8 Color Four, 1 size 12mm glass bead, 1 size 8 seed bead , another 8mm purple fossil bead, 15 size 6 seed beads, 1 size 8 green seed bead, 1 size 8mm purple fossil bead, 1 green size 8 seed bead, 15 size 8 seed beads, 1 green size 8, 1 oval size 10mm to 12mm pink glass bead, 1 green size 8 bead, 15 size 6 seed beads, 1 green size 8 seed bead, 1 8mm purple fossil bead, 1 green size 8 seed bead, 15 size 6 seed beads, 1 green size 8 seed bead, 1 purple 8 mm fossil bead, 1 green size 8 seed bead, 110 size 6 seed beads and then start back down the strap with the same equivalent as the beginning side. When you have all the beads on, take your needle into the fiber on the opposite side. Then weave through your fiber until the thread is in tight. I would go back through the strap with double thread two more times if possible for strength if using Silamide thread. If you are using Conso thread that will not be necessary.
Enjoy and experiment! That is what we are all about.
| When you make copies of these instructions to share with your friends, please tell them you got them at Beadwrangler's. |